This document explains the actual business process of Train booking and cancellation. This document explains how user can create new train bookings & cancel the existing booking, how file TDR against train booking. This document explains step by step description of train booking and cancellation. This Document will help user(Agent) in understanding the business process of Train service.
The purpose of this document to give full fledged knowledge of Train service to portal user and sort out all the query of portal user related to the train service.
It's scope covers the entire business functionality of Train Service.
- Train Booking Normal flow
- Train Quick Book
- Train Cancellation
- Train Queue
- TDR request
2. Train Booking Functional Flow
Precondition: User should be login www.travelboutiqueonline.com with his credential. As user login portal with his credentials, system displays announcement page. Any updates / news with respect to TBO display on the announcement page.

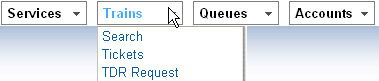
As user log-in with his credential System displays the announcement page. If user wants to book the train ticket then he needs to click on the search under train tab. As user click search option under train tab system displays the train search page.
Menu Link: Train ![]() Search
Search
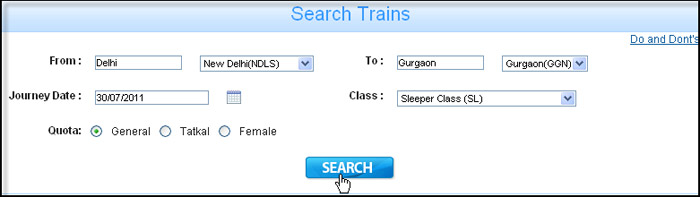
On search result page user needs to fill all the mandatory details like From(Source), to(Destination), journey date, class, Quota.
There are various classes provided by the IRCTC. Train ticket fare varies depending of the class. Sleeper class Is the most economic class among all classes provided by IRCTC.
- First AC & Executive Class (1A)
- AC Sleeper (2A)
- First Class (FC)
- AC 3 Tier (3A)
- AC Chair Car (CC)
- Sleeper Class (SL)
- Second Class Seats (2S)
- AC 3 Tier Economy Class (3E)
Quota is reservation provided by the IRCTC. There is three type of quota available in the TBO portal that is General, tatkal and female.
General Quota: Train Availability in all Type Classes. User can make Booking upto the 90 Day from Current date.
Tatkal Quota: User can book tatkal ticket one day before the journey date. One user(agent) can book only one tatkal ticket one train and maximum four passenger can be book in the one tatkal train ticket. After filling all the mandatory detail user has to click on the search button. As user click on the Search button system displays train search result page.
Female Quota: Train available only for Sleeper Class. For Other Classes female Quota is not available.
After filling all the mandatory detail on the train search page as user click on the "Search" button system show the train search page.
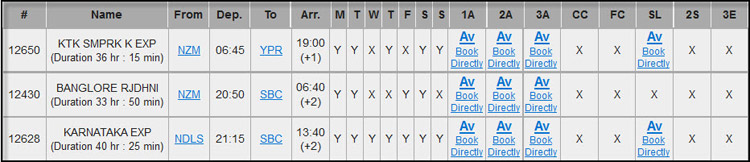
Train search result page shows all the available train on the user selected route with the following details like train no, name of the train, departure and arrival point, departure and arrival time. From Train Search result page, User can book Confirmed Train Ticket or Waiting Ticket.
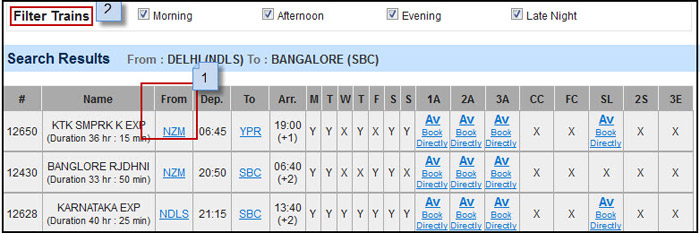
If user wants to change the boarding point on the search result page then he can accomplish this with the help of "from" link on the Train Result page. As user click on the "From" link pop up window appears having all the boarding station corresponding to the train. From the pop up window user can select any boarding station and click on the "Go" for coming back on the train search result page.
When user search train by default system displays the all the trains available on user selected route. Filter train option allow user to filter train as per his convenient timing. Search result page shows all trains available in the user selected route with all class availability. There are two ways to continue booking process.
- Through check Availability
- Through Book Directly
2.5. Through check Availability
As user click on the "Av" link to check availability for any specific class. System displays the day wise availability status of complete week corresponding to that class. For selecting any specific class again user has to click on the "Av" link after checking availability. Now as user again click on the "Av" link corresponding to specific day availability then system takes user to the Passenger detail page. (Please refer below screen shot)
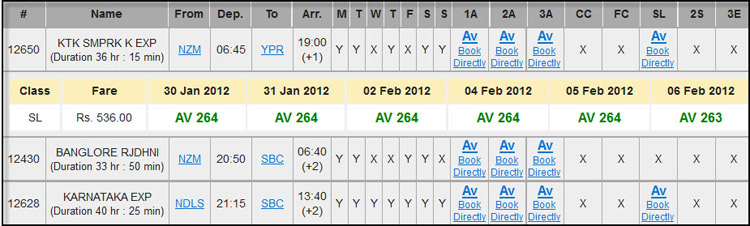

If user click on the "Book Directly" link on the train search result page.Then system does not show availability corresponding to the user selected class and directly redirect user to the train passenger detail page (Please refer the below screen shot)

As user click on the "Book Directly" link on train search or "Av" link after checking availability on train search result page in both the case system takes user to the train passenger detail page.
If user wants to go back on the train search result page for modifying the search criteria from passenger detail page then he can accomplish this with the help of "Modify Search" link. As user click on the "Modify Search" link. System takes user to the train search page.
User needs to fill complete detail of all passengers like name, sex are the mandatory fields. There are four Types of Passenger and for all type passenger different fare applies as per the IRCTC norms. IRCTC has divided the passenger into the below mentioned four category based on their age.
- Infant (0-4 Years)- Kids below age 5 Years are considered to be an infant and there is no chargers for an infant ticket, but infants are not allocated seats.
- Child (5-11 Years) - Traveler between the age of 5 to 11 years are consider as child and get the child concession in the ticket fare.
- Adult(Age 12-60) - Traveler between the age of 12 to 60 years are consider as adult.
- Senior Citizen - Male > 60 & Female >58 are considered Senior Citizen and senior citizen fare applicable for them. For taking senior citizen fare concession user needs to check on the check box of the Senior citizen on the passenger detail page, if user does not Select the senior citizen check box then the pax considered to be adult passenger type irrespective of age and would not get the concession in ticket fare.
3.3. Booking as per Berth Allotted
Four options are available as per allotted berth to passenger and if none is selected by user then booking should be done as per availability of seats in the class while booking. If all above conditions does not meet with IRCTC (IRCTC does not have Berth selected by user) then Ticket will go unsuccessful.
3.4. Consider for Auto Upgradation
Usually there are some quotas in the railway booking. E.g. Foreign tourist quota, military quota, ladies quota etc. When these quotas are not booked then the system automatically upgrades a passenger to that particular category. Let suppose user have booked a ticket in 3AC. If user get an auto-upgrade then user will go to 2AC. The passenger in sleeper class is upgraded to 3AC and those who are in RAC/WC get a confirmed ticket and so forth. This up-gradation is totally depend on IRCTC.
All the boarding point with in the user selected route displays in the Drop down box. User can choose any boarding point convenient to him.
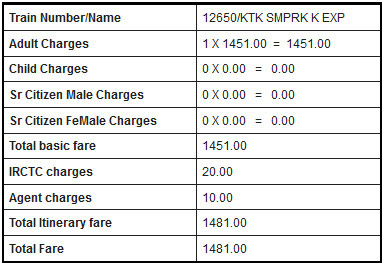
If user wants to see the ticket fare on the passenger detail page then he can accomplish this with the help of "Calculate fare" link Calculation is depend on passenger type. After filling complete passenger details, as user click on the "Calculate Fare link" a pop up box opens and show the ticket fare.
- Fare Calculation pop up box show Fare for every Type of Passenger, Passenger Type depends upon Passenger Detail information.
- Pop up boxe shows IRCTC Charges & Agent Charges (Principle agent charges + Sub agent Charges).
In the Contact details user needs to enter the Mobile no of and address of the traveler passenger.
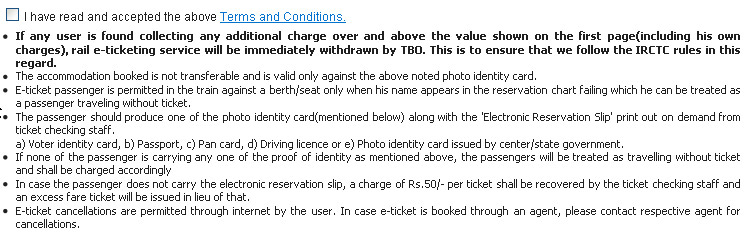
User need to accept terms & condition check box before proceed to booking. If user wants to see the terms and condition of IRCTC then he can accomplish this with the help of "Term and Condition" link.
As user click on the "Term and Condition" link a pop box open and show the Term and condition of IRCTC. (Please refer the below screen shot)
After filling passenger information on the train passenger detail page user has to click on the "Book Train" button. As user click on the "Book Train" button booking proceeds and system display a verification pop-up box.
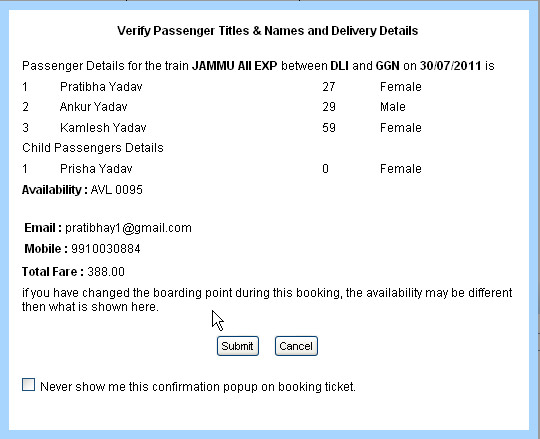
4. Train Booking Verification Pop-up
Booking verification pop-up box shows the train details like train no, sector and date and passenger contact detail like name of passengers, age, sex and email id and mobile no of primary passenger.
User needs to click on the "Submit Button" if train and passenger contact details are correct and user wants to proceed for booking.
If user click on the "Cancel" button then booking does not proceed and system navigate user to the passenger detail page.
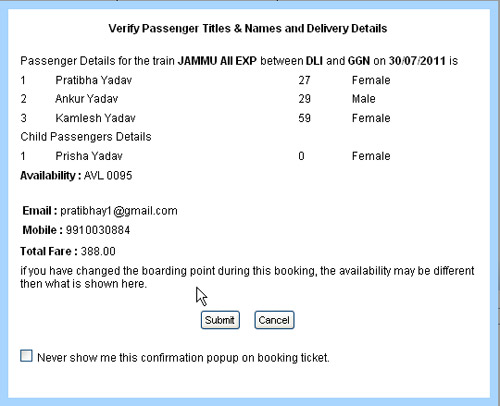
Note: The pop-up will appear if only "Send me Train Confirmation" check box is on in "Change Profile" functionality notification option.
As user click on the Submit button after verifying the details on the Verification popup box the booking proceeds and system navigate user to the view train page with the message "Booking done Successfully)". (Please refer the below screen shot
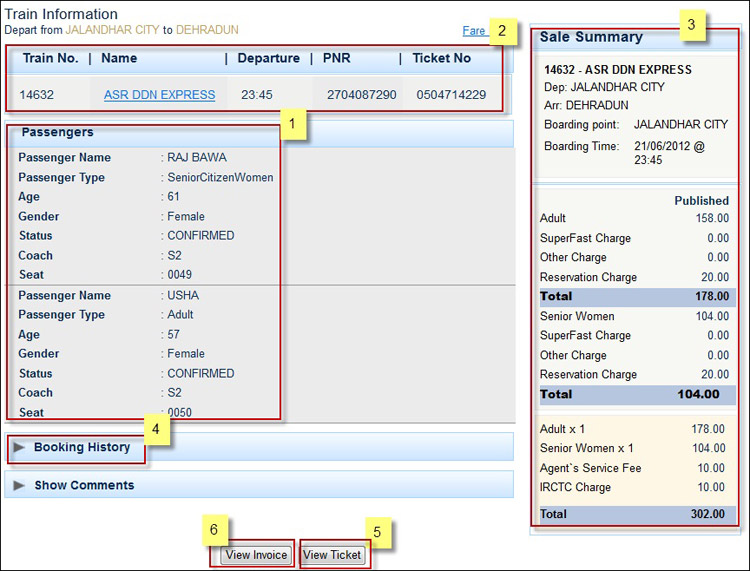
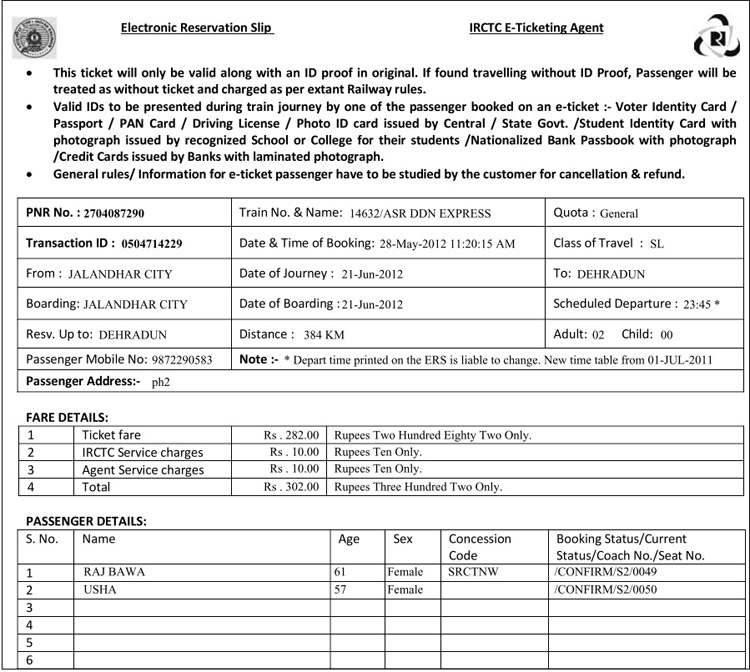
Passenger detail shows the Complete passenger information including booking status, coach and seat no.
User can view all details of Train Train No. and Name, Departure and arrival times, PNR no, ticket No.
It includes train information and rate break up of total fare as per passenger type.
It shows date, time of the booking and name of agency owner from whose account train ticket created. Show Comments - If there is any information need to add regarding booking then user can add his comments using this.
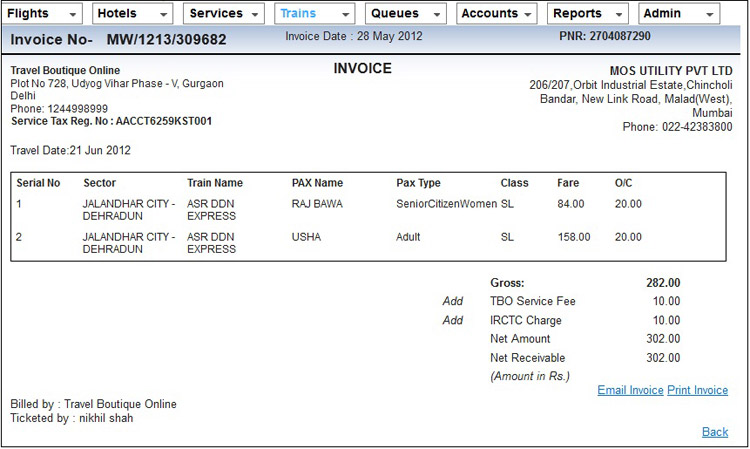
View invoice button shows the invoice generated against the ticket. As user click on the "View Invoice" button system shows invoice of ticket which has created against the ticket. (Please refer the below screen shot)
Back: Back link redirect user to the viewtrainbooking page.
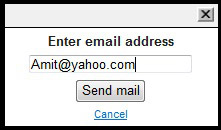
Email invoice: If user wants to send the Email the invoice of the ticket then he can accomplish this with the help of "Email" link. As user click on the "Email Invoice" link system show the popup box in which user has to enter the Email address and click on the send button.
Print Invoice: IF user wants to take the print of the invoice then he can accomplish this with the help of "Print Invoice" link.
As user click on the View ticket button system shows E-ticket. (Please refer the below screen shot)
4.8. Event Occur After booking creation
- Ledger Updation - One entry goes In the user(agency) ledger against the ticket.
- If train ticket status is ticketed/Wait-listed/ In-Progress then the booking amount should deduct from the user cash account.
- Ticket having Ticketed /Unsuccessful/In Progress / Wait listed status show in Train Ticket Queue.
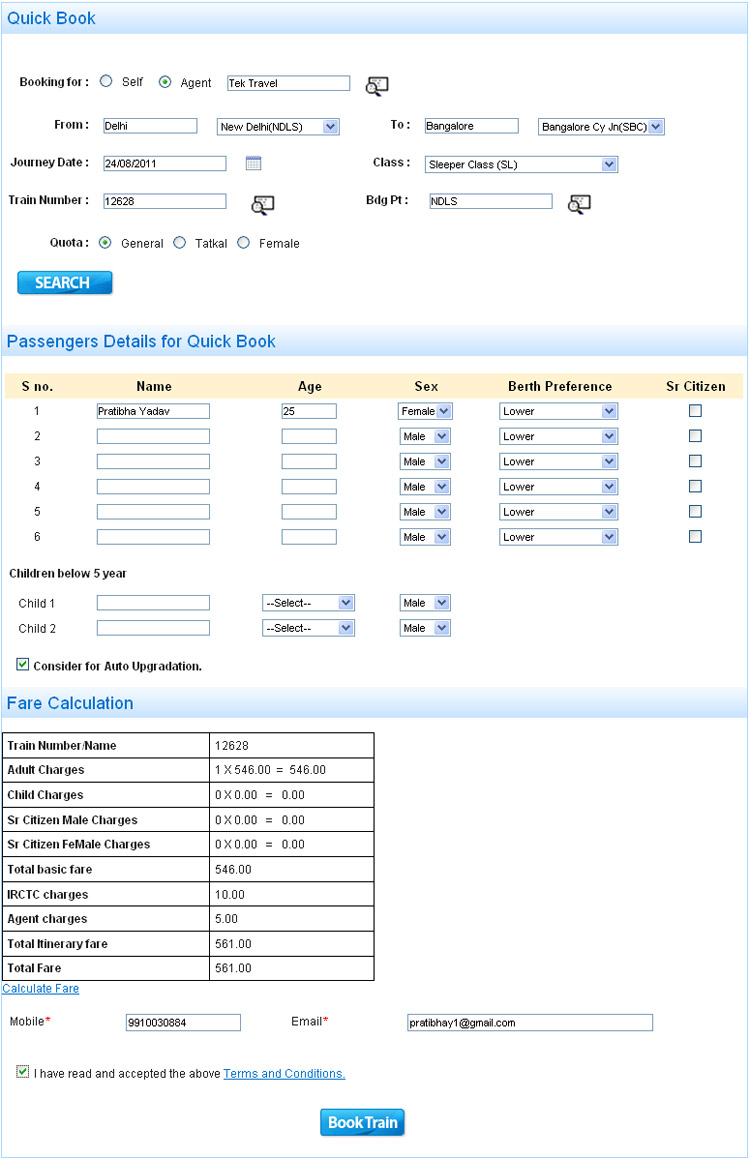
"Quick Book" functionality is used to book train in one go without checking availability and whole booking process should be done from one single screen.
5.1. Functional flow of the functionality
Complete details of train including train number and all fields are mandatory, then user can book ticket in one go from the same page. Below mentioned are field details -
User needs to enter the name of the origin city from where user needs to board-in the train.
Station specific booking, availability shows or train book as per stations selected. In normal flow search and availability comes as per state wise not station.
User needs to select the date of journey.
Result should come only for chosen class. Class specific booking, It is working as per selected class. If sleeper is selected then user can book ticket only for sleeper.
In the train number user has to enter the train no through he wants to travel. If user wants to see the all available train number between the user selected route then he can accomplish this with the help of "Search box" option next to the Train Number field. As user click on the "search box" system shows all the available train's train number of user selected route.
In the Bdg pt user has to enter the boarding point from where user wants to board the train. If user wants to see the all available boarding point of user selected train then he can accomplish this with the help of "Search box" option next to the "Bdg pt" field. As user click on the "search box" system shows all the available boarding point of user selected train.
Quota is reservation provided by the IRCTC. There is three type of quota available in the TBO portal that is General, tatkal and female.
In the "Passenger detail for Quick Book" user needs to fill the passenger detail like S.no, Name, Age,Sex, Berth Preference and Sr. citizen, If traveler is traveling with infant then user needs to enter name , age and sex needs ot enter.
Fare should be calculated as per given criteria and passengers.
User needs to enter the mobile number E-Mailid and address of traveler.
User need to accept terms & condition check box before proceed to booking. If user wants to see the terms and condition of IRCTC then he can accomplish this with the help of "Term and Condition" link. As user click on the "Term and Condition" link a pop box open and show the Term and condition of IRCTC. (Please refer the below screen shot)
After filling passenger information user has to click on the "Book Train" button. As user click on the "Book Train" button booking proceeds and system display a verification pop-up box.
Booking verification pop-up box shows the train details like train no, sector and date and passenger contact detail like name of passengers, age, sex and email id and mobile no of primary passenger.
If user click on the "Cancel" button then booking does not proceed and system navigate user to the passenger detail page.
User needs to click on the "Submit Button" if train and passenger contact details are correct and user wants to proceed for booking.
As user click on the "Submit" button on the verification pop-up box then booking gets created and following events gets triggered.
5.2.1 Event Trigger after Booking Creation
After booking below mentioned events are triggered -
- Agency Cash Balance Updation - Train booking amount gets deducted from the agency account.
- Ledger Updation - After booking, one entry goes in agency ledger against booking creation. It shows Train Ticket booking Amount as debit entry.
- Ticket should en-queued in the train ticket queue.
6. Train Booking Cancellation Functional Flow
If user does not want to travel after booking train ticket then he can cancel the ticket online Online train ticket cancellation is live for user (agent).
Menu Link :Queues ![]() Train
Train ![]() Tickets
Tickets
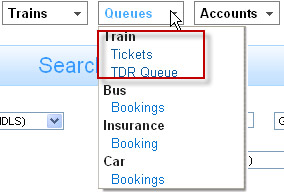
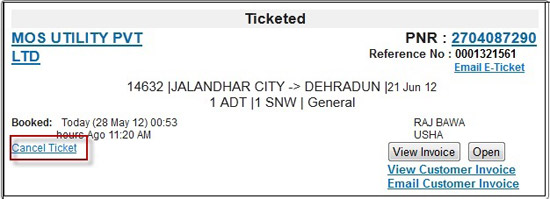
As user click on the train ticket under Queue tab system navigate user to the train ticket queue.Train ticket queue show the booking created by the user(agent). Filter the ticket user wants to cancel through various filter like search by ticket no, pnr, pax name given in train ticket queue.
6.1. Request cancellation pop-up
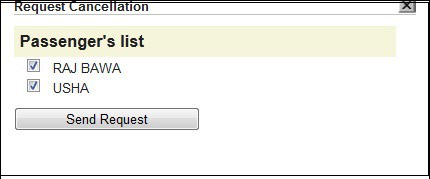
After filtering the ticket in the ticket queue user has to click on the "Cancel ticket" link. As user click on the cancel link a pop box appears, which shows all the passenger name booked in the train ticket.
User needs to select the name of passengers to whom user wants to cancel and click on the "Send Request" button to send cancellation request to IRCTC. (Please refer the below screen shot)
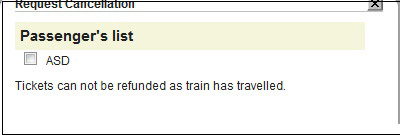
Cancellation is possible only for those bookings whose Travel Date should be equal to or greater than Current Date. In case of Travel Date has been passed and user tries to cancel the booking by clicking on the "Cancel ticket" link then cancellation pop up box does not show the "Send Request" button with the intimation message "Tickets can not be refunded as train has traveled". (Please refer the below screen shot)
6.2. Event Trigger after cancellation
After cancellation below mentioned events trigger -
- E - Ticket - Status on e-ticket changes to "Canceled" only for those passengers whose ticket has been canceled and "Total Amount before cancellation" is updated and removal of Coach No /Seat No / Berth. (Please refer the below screen shot)
- Ledger Updation - After Cancellation, two Ledger entry goes in agency ledger. It shows Train ticket refunded amount as credit entry & Cancellation charges as debit entry.
- Agency Cash Balance Account Updation - Amount refunded by the IRCTC (after deducting the cancellation charges from ticket booking amount) processed in the user(agent) account.
When ever user cancel train ticket a credit note generates against cancellation with unique credit code no. including following information - train ticket amount, cancellation charges, refunded amount, passengers and train details which is mentioned on the PNR. Single credit note should be generated for all passengers whose cancellation is done at same time. User can print or e-mail credit note after opening the credit note.
TDR (Ticket Deposit Receipt) is a process to get refund from IRCTC against the particular ticket, which is confirmed but passenger didn't travel due to any reason and if passenger is already availed the service but did not get the facilities, services etc which should be provided to the passenger while journey as mentioned at the time of booking.
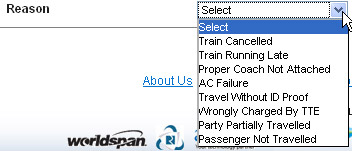
Below mentioned are the condition against which user can file Tdr request -
- Train Canceled By Railway
- Train running Late by More than Three hours.
- Difference of Fare in case proper coach not attached.
- AC Failure
- Traveled without proper ID proof
- Wrongly charged by TTE
- Party partially traveled
- Passenger Not traveled
7.3. TDR Filing Process Functional Flow on Portal
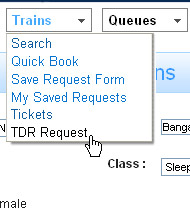
Menu Link : Trains ![]() TDR Request
TDR Request
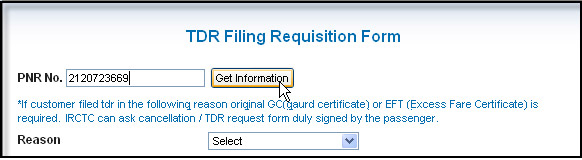
To file TDR request user needs to retrieve PNR information. For Retrieving pnr user needs to enter the pnr and click on the "Get Information" button as user click on the "Get Information" button after entering the pnr number, system shows the details corresponding to the pnr number.
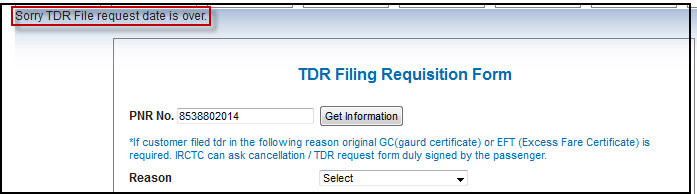
User can fill TDR request after the 24 hours of train departure to till 30 days. If filling date for TDR is already elapsed then System display. Message "Sorry TDR File request date is over". (Please refer the below Screen shot)
7.5. Select Reason for filling TDR
After retrieving the PNR information user need to select passengers against which he is filing TDR and also select the reason for filing TDR. (Please refer the below Screen shot)
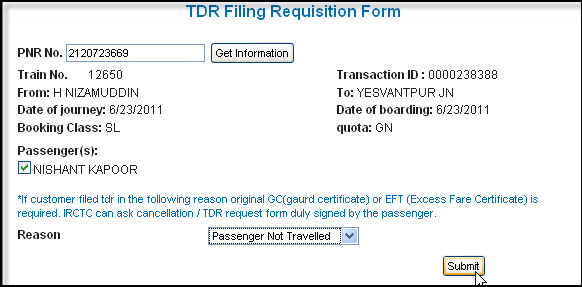
After selection the passenger and reason of TDR, user needs to click on the "Submit" button. As user click on the submit button system sends the TDR request to the IRCTC. TDR request is processed by IRCTC with in 90-days. With in 90 days IRCTC process the refunded amount in the TBO account.
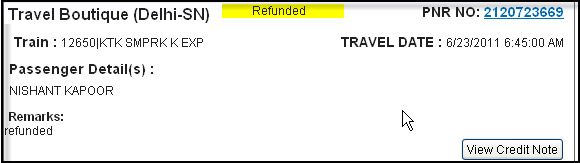
7.6. Refund process to agent & creation of credit note
After getting the TDR amount from the IRCTC.TBO process the same amount in the Agency account. Agency can see the amount refunded from Tbo in the train tdr queue through "View credit note" button. User can view credit note against the TDR by clicking on "View Credit Note" button in the train tdr queue. Credit note has its own unique number. Total refund amount should display on credit note with total fare and cancellation charges.
7.7. Event Trigger after Process TDR / Cancellation
After cancellation below mentioned events trigger.
After Cancellation, Ledger entry shows in the agency ledger. It shows Train Ticket Refunded Amount as credit entry & Cancellation charges as debit entry.
7.7.2. Agency Cash Balance Account Updation
Amount refunded by the IRCTC against the TDR request is processed in the user(agent) account.
Queues are maintained to club the same type of data. Like all bookings should be save in Ticket Queue.
Ticket Booking Queue - All bookings created for Train are comes under "Train Ticket Queue", irrespective of the status of that particular booking. Details of each & every booking of train can be checked under Ticket Queue
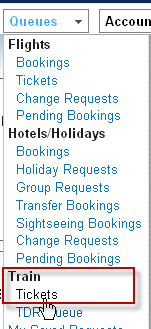
Menu Link : Queues ![]() Trains
Trains ![]() Tickets
Tickets
- Search filters is based on the status of booking i.e. Ticketed, Canceled, In Progress or Unsuccessful are implemented which facilitates user to search any particular booking based on the status.
- User can also check e-Ticket, cancel any booked ticket, view invoice & view booking through ticket queue.
On extreme right side of the page, we have filter which is used to search bookings.
8.1.1. Search by booking status
There is four type booking status train ticket: Ticketed, In progress, Canceled & Unsuccessful. Every booking whether it is in Ticketed, In progress, Canceled or Unsuccessfully status will have following details -
- Agency Name
- Train number, Source & Destination station names with traveling date.
- Number of passenger with their Type (Adult, children, senior citizen) & name of all passengers.
- Date & time of booking of ticket.
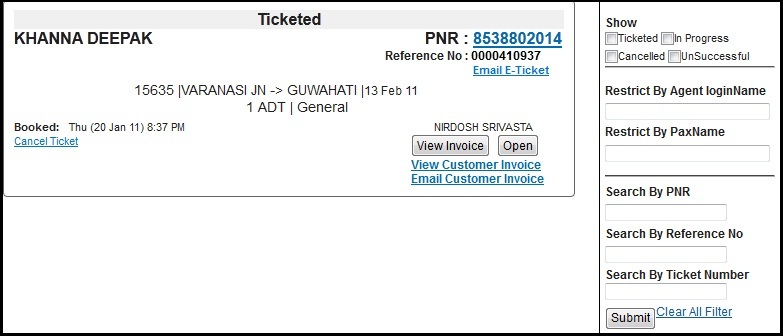
Bookings which are successfully created should come under ticketed status. All ticketed (successful) bookings can be search by checking this filter option. By default "ticketed" status tickets should visible. Each ticket entry should have below mentioned details -
- PNR Number link - e-Ticket for that PNR will be opened.
- Booking Status will be 'Confirm/WL/RAC' on the tickets under this category.
- 'Cancel' link - For canceling the ticket.
- 'View Invoice' link - This link redirect user to the agency invoice page.
- 'Open' link - It will open the detailed page of ticket confirmation. (View booking for ticket page)
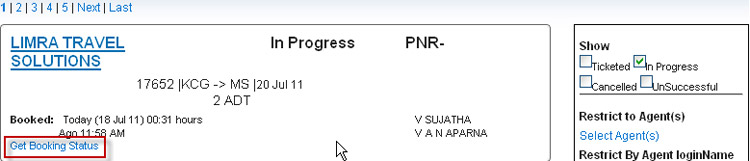
Below mentioned are the reasons due to which train booking goes to In-Progress status.
- TBO System did not get correct response from IRCTC against ticketing request.
- TBO System got Response from IRCTC but some problem occurred in the TBO server.
- When berth preference condition did not meet.
If user wants to see the In-Progress status booking then User has to check on the in-progress status check box and click on the "Submit" button. Booking having In-progress status would display in the booking queue.
- Get Booking Status link
- Get Booking status link uses for getting the current status of the booking.
If train ticket goes to In-progress state, booking amount debited from user account a link of "Get booking Status " show in the Train booking queue on the corresponding train booking having status In-Progress. As use click on the "Get booking status" train ticket goes unsuccessful then booking amount refunded to the user account. But if train ticket gets successful then pnr generated against the booking.
User has to click on the "Get Booking Status" link on the same day. Let suppose train booking created on the 20-Jan-2012 then user can get the status of the In-Progress status booking using the link "Get Booking Status" on the same day that is 20-jan-2012.
All Canceled status tickets can be searched by using this filter. If user wants to see the canceled status ticket then User has to check on the "Canceled" status check box and click on the "Submit" button. Booking having canceled status would display in the booking queue. Below mentioned details come for all canceled tickets -
- "PNR" link: Updated E-Ticket gets display when this link is clicked by user.
- Booking Status shows 'Canceled' on the tickets under this category.
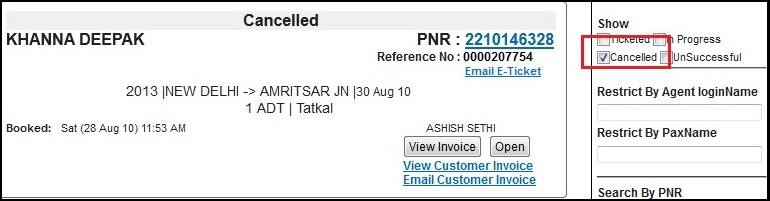
Note: Ticket that is created for 4 passengers and ticket has been canceled for 2 passengers out of four. Now this ticket will not come under 'Canceled' category, it will be displayed under 'Ticketed' status and only on e-ticket cancel status would be updated. Once the ticket for all four passenger (by canceling for remaining 2) will be canceled than its status will come under 'Canceled' category.
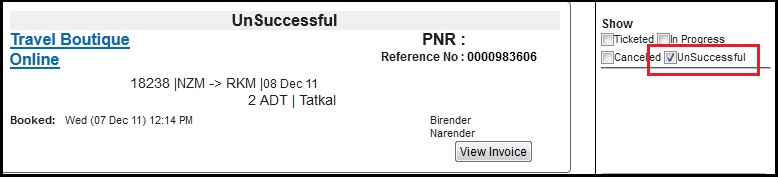
All unsuccessful bookings comes under this category. Unsuccessful status booking does have the pnr number. If user wants to see the unsuccessful status ticket then User has to check on the "unsuccessful" status check box and click on the "Submit" button. Booking having unsuccessful status would display in the booking queue.
Four more filters are also available to search booking which are mentioned below -
This filter search booking by name of passenger. User needs to enter name of the pax and click on the "Submit" button. All the bookings having same pax name which is entered by user in the "Restrict by PaxName" filter would display in the queue
This filter search specific booking by PNR no of the train ticket. User needs to enter pnr no of ticket and click on the "Submit" button. Booking having same confirmation no which is entered by user in the "Search by Pnr" filter would display in the queue
8.1.9. Search by Ticket Number
This filter search specific booking by PNR no of the train ticket. User needs to enter ticket number and click on the: "Submit"button. Booking having same ticket number which is entered by user in the " Search by Ticket Number" filter would display in the queue.
Option will clear all applied filters & display all bookings in the queue.
Whenever a ticket has been canceled a credit note generates against the cancellation of the ticket.
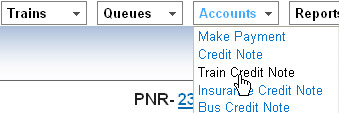
Menu Link : Accounts ![]() Train Credit Note
Train Credit Note
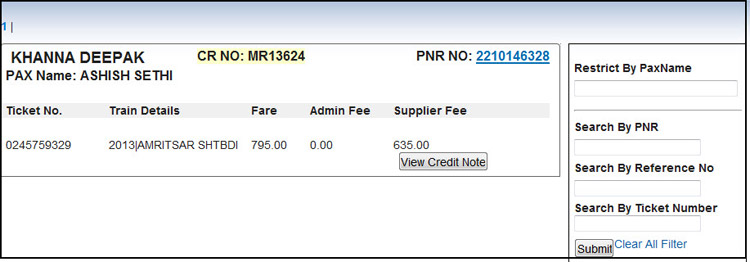
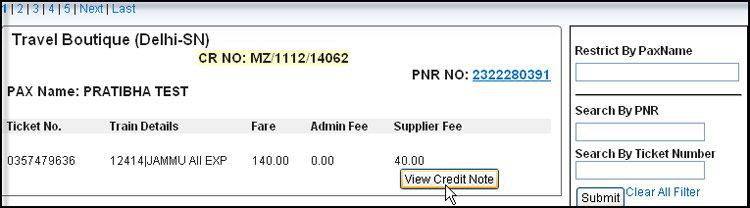
- Each credit note has its own credit note number (CR NO: MZ/1112/32684)
- Credit note in the credit note queue consist Ticket number, Train details and Fare with cancellation charges as Admin Fee and Supplier Fee.
- Credit note also consist name of the pax for whom ticket has been canceled.
- PNR NO. Link - Shows the updated E-ticket.
- View Credit Note - As user click on the "View credit Note" button system navigate user to the create credit note page which shows the train number, pax, name passenger type, class, and break up of the far as gross charges, TBO service charges, IRCTC service charges.
Filters - Below mentioned filters are available to search any credit note -
This filter search booking by name of passenger. User needs to enter name of the pax and click on the "Submit" button. All the bookings having same pax name which is entered by user in the "Restrict by PaxName" filter would display in the queue.
This filter search specific booking by PNR no of the train ticket. User needs to enter the name pnr no of ticket and click on the "Submit" button. Booking having same confirmation no which is entered by user in the "Search by Pnr" filter would display in the queue.
This filter search specific booking by PNR no of the train ticket. User needs to enter ticket number and click on the "Submit" button. Booking having same ticket number which is entered by user in the "Search by Ticket Number" filter would display in the queue filter.
8.2.3. Search by Reference Number
When ever user created a train booking a reference number is assigned to the train booking irrespective of status of train booking.This filter search specific booking by "Reference Number" of ticket. User needs to enter "Reference Number" and click on the "Submit" button. Booking having same reference number which is entered by user in the "Search by Reference Number" filter would display in the queue filter.
Options will clear all applied filters & display all credit note in the queue.